Updated February 16, 2022
This guide is for performance optimization. If you’re looking for conversion optimization, check out our Shopify Conversion Rate Optimization Guide.
We’ve successfully optimized hundreds of Shopify sites, ran experiments, analyzed data, and dialed in the tactics to make sites faster.
These are the main points of optimization for Shopify sites:
- Image optimization
- Reducing server requests
- File minification
- Technical optimizations
- Design optimizations
This guide gives you the tools and knowledge on how to analyze, optimize, and benchmark your site’s performance… or analyse and optimise for our friends across the sea 😉
If you get stuck, feel free to contact us. If you start reading and be like “maaaaan I don’t have time for this”, you can hire our experts to optimize your site for you.
Sections
- Why optimize your site?
- Page speed factors
- Analysis / optimization tools
- How to analyze your site
- How to optimize your site
- Notes about apps
- Summary
WHY OPTIMIZE YOUR SITE?
Improving your load speed helps improve metrics like:
Faster websites make more money. Here are some data backed case studies and an ROI calculator.
In 2018 Google started mobile first indexing – they started ranking sites according to the mobile version instead of the desktop.
This makes mobile performance especially important. We’ve actually had customers contact us for optimization help after noticing a drop off in rankings after this update.
PAGE SPEED FACTORS
There are 4 main factors to determine how fast your page will load:
- Server speed
- Connection speed
- Number of requests
- Page weight
Shopify servers are fast and you can’t control them anyway, so you don’t need to worry about this.
Connection speed varies by user and country. If the majority of your traffic is coming from mobile, help those customers out by making sure your site is loading well on any speed.
Requests are the files needed to load your page. Each app, image, and file on your page needs to be downloaded from servers, contributing to total number of requests (files).
Page weight is the cumulative file size of your page. Logically, reducing page weight and server requests will make your site load faster.
The most significant gains will usually come from: lazy Loading, full image optimization, and app analysis / optimization.
ANALYSIS AND OPTIMIZATION TOOLS
Shopify Analyzer
This analysis tool shows you what can be optimized, gives recommendations how to fix, and gives a meaningful score in each area.
WEBPAGETEST
This is the most accurate tool we’ve found for measuring load speed, page weight, and number of requests. Bonus: you can select different server speeds to simulate different devices.
Chrome Dev Tools
This is a great tool for web developers. For Shopify optimization, we’ll be using the Console and Network features.
Google PageSpeed Insights
You can get some ideas from Google PSI but it isn’t a good tool for scoring or optimizing Shopify sites, so we don’t use it. Here’s why: The Truth About Google PSI for Shopify
Note about the new Shopify speed tool, it uses the same engine as Google PSI so it may be difficult or impossible for you to achieve a high score. To see why + our recommendations, see Shopify Speed Tool Analysis.
Crush Pics
This is an essential app for image optimization. It automatically compresses your images, making your whole site load faster without losing image quality.
TinyPNG
Image optimization apps for Shopify can’t compress 100% of images due to access restrictions, so you’ll have to manually compress some images. This is where TinyPNG comes into play. It’s a free web app to optimize images for any medium.
AMP by Shop Sheriff (optional)
If you seek maximum performance, Google AMP will get you there. This app creates a set of AMP pages that load instantly when landed from Google search. There are design tradeoffs so it’s not for everyone, but if you’re obsessed with Google PageSpeed Insights score this is your solution. More info here: Shopify AMP Guide.
How to analyze a Shopify site
We built a tool specifically for Shopify sites to make it easy for you to see what can be optimized, and give you a score based on the results.
It’s called the Shopify Analyzer… aka the Analyzer.
![]()
Open the Shopify Analyzer in a new tab while you’re going through each optimization point below.
The Analyzer will show you what’s good and what needs to be optimized.
You can start with just your home page, or you might open 2 tabs and analyze both home page and your most popular product page.
If you score in the green, you can skip the section below referencing that area. If you score in the red, there are potential optimization issues.
If you optimize all of the points below, you should be able to score an A on the Analyzer, and at least a 90/100.
How to optimize a Shopify site
Alright, onto the good stuff!
Optimization is limitless, you could really get into the micro details, constantly tweaking, going deep into technicalities, but the ROI becomes lower as you spend more time and money squeezing out every last drop.
We’re going to focus on the most important optimization points that to get a faster site without risking a technical overhaul.
With your analysis open in a new tab, let’s get to it:
1. Image Optimization
Images are heavy, making image optimization a key tactic for a faster site.
Complete image optimization has 3 main components:
- Compression
- Image size on server
- File type
Image compression strips unnecessary meta data, uses algorithms to combine data and similar patterns, and can reduce the total amount of colors needed.
Good compression apps reduce the size of your image files with no noticable difference in quality or color.
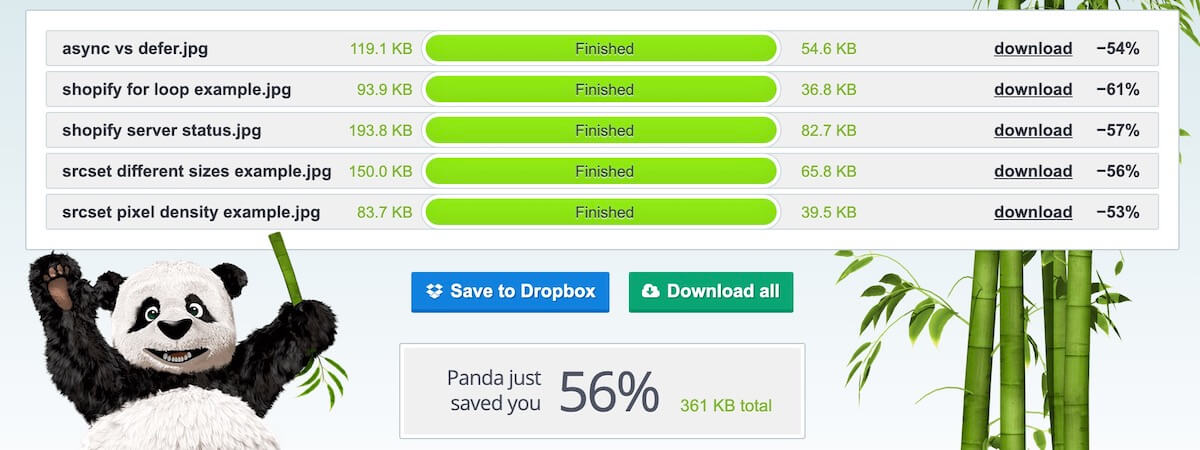
Here’s an example of file savings for some images I compressed in this post:
Follow the steps here: How to compress images on Shopify to compress all your images using Crush Pics and TinyPNG.
Here’s what Crush looks like when you first install it and start compressing:
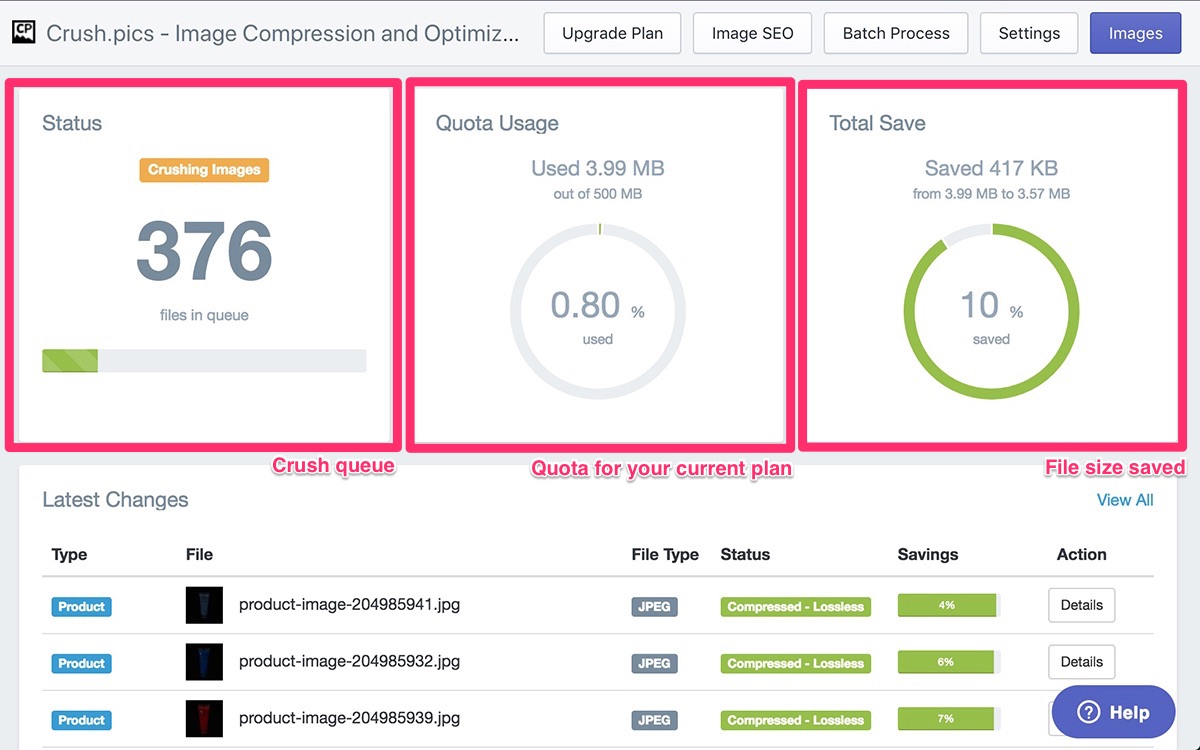
*Crush Pics (or any image optimization app) is optional, but will save you a LOT of time trying to manually compress every image on your site.
If you’re using Crush Pics check out our guide to image SEO on Shopify that utilizes the automatic image alt text updater feature in Crush Pics.
Image size on server refers to the dimensions of the image being downloaded to your web page. Many themes load images that are larger than necessary, or larger than the logical size the image needs to be.
For example, if your theme code allows you to upload a 2000px image, that’s no good on a phone with a screen size of 400px width.
Some themes will load a 2x sized image for max resolution on retina displays. This is a design preference but performance tradeoff. We usually like to load images 1x – 1.5x the actual container size in the browser.
You can solve these issues by editing your liquid code to load a smaller image, or use srcset. Modern themes like Turbo will often use srcset, which conditionally loads the right image size depending on the device.
You might want to have a developer implement this for you, but here’s a brief explanation how it works:
You can choose a different image based on pixel density. For example 1x on normal screens and a 2x size image on retina displays:
![]()
You can also choose different images for different screen ranges, like this:

The src attribute now becomes the fallback, with the srcset instructions loading a different image depending on the device accessing the page.
Good news: If you have lazy loading (described further down), you only need to worry about scaling images above the fold because images below the fold will be hidden until the user scrolls them into view.
File type is typically JPG, PNG, or SVG. They each have pros and cons and should be used strategically for best performance.
SVG (vector graphics) are usually the best to use for graphics because they’re infinitely scalable without losing resolution. Logos, icons, and non-illustrative graphics can usually be served as an SVG.
JPG is best for photographic images.
PNG is good for graphics with text in them, or images where you aren’t able to use an SVG.
Using PNG instead of JPG on a photographic image can increase the file size 2x – 10x with the same resolution 😧
You can scan your files in the Network tab of Chrome Dev Tools or by clicking on Total weight in the Analyzer. Sort by file size and look for heavy images with a “.png” file extension. If they’re photos, download and convert to JPG to save significant file weight.
2. Reducing server requests
Reducing the number of files loaded on your page makes your page load faster.
There are 2 key factors here for Shopify sites:
- Lazy loading
- App issues
Lazy Loading
If you scored an F in the Shopify Analyzer for Number of requests, make sure you have lazy loading set up first.
Lazy loading is a performance optimization technique that loads images as the user scrolls down the page, instead of during the initial page load.
It’s also known as “defer offscreen images” in some tools.
We often see a 10% – 30% reduction in page weight by implementing lazy loading.
Learn more about lazy loading and how to implement here: Lazy Load Images to Make Your Site Load Faster. Warning: You might need a developer for this one 👨💻
App Analysis
If you score an F in the Shopify Analyzer for Number of domains, it’s likely that you have unnecessary scripts loading.
Apps are awesome, they create an engaging website and help you make more sales. Keep in mind though that each store facing app you add will add to your load time.
Our case study How Shopify apps affect load speed shows the page speed affect of installing multiple apps, measuring performance at each step.
I don’t recommend uninstalling apps. I recommend optimizing apps.
For a more detailed guide specific to app optimization see our App Optimization Guide for Shopify.
🔧 App optimization step #1: uninstall any apps that aren’t converting well, or that you don’t really need.
You might be hanging onto an app or 2 because it looks cool or people say it works, but here’s where you need to use your data and A/B testing to see if it actually works.
Google Analatics, the app’s analytics (if they have it), customer feedback, and heatmapping (using a tool like Hotjar) will help you decide how useful an app is.
🔧 App optimization step #2: make sure there isn’t old app code still loading in your theme.
If you’ve uninstalled a few apps, it’s possible there is old app code running on your site (we see this pretty often).
You can check this by opening Number of domains in the Analyzer.
This will show you each domain contributing resources to the page. You might not recognize every domain, but if you notice a domain that belongs to an app you uninstalled, then guess what it’s still loading files 🥴
You can usually find these scripts and stylesheets in your theme.liquid file, although they may be in other places as well.
🔧 App optimization step #3: conditionally load app scripts.
Conditional loading = only loading the resources on the pages they’re needed.
This requires editing html and liquid code + testing to make sure nothing breaks, so proceed with caution.
Example: a lot of times apps will put their scripts/css in the theme.liquid file because it’s easy and covers more use cases. If that app is only needed on the Product page, then that script could be loading on every page on your site unnecessarily.
To solve this, you can limit resources to only load where they’re needed, like this:

To learn more about conditional loading, check this post: Shopify Liquid Lesson: Conditionally Load Apps.
Any time you make edits to your theme, make sure you duplicate it first and work on the backup theme to make sure you don’t break your live theme. Preview and test before publishing.
Concatenating scripts and stylesheets
Also known as merging files.
I personally don’t think this is worth doing for Shopify sites, but it’s an optimization technique to reduce resources, so I’ll mention it.
The idea is that you combine your files into a single file to minimize the number of requests, which theoretically improves load speed (this used to be more important before HTTP2.)
Cons:
- It can break your site
- If you combine files you use now, but later don’t need those files, you’ll be loading extra code
- It can be time consuming and maintenance heavy
- It’s more difficult to conditionally load
I usually don’t see much performance gain from this tactic, but it might help, you can make the call 🙂
3. File minification
CSS and JavaScript are text files written in code that control the styling and behavior on your site.
Minifying these files compresses them by removing extra characters like spaces and comments, shortening variable names, and combining common styles.
Coding is like writing: we code using styling and naming so it makes sense to humans and is easier to debug. In a production environment, the computer is reading the code.
Computers don’t care about style and only need the string of characters and commands, so these files should be minified to save weight.
If you don’t want to deal with code and prefer to use an app to minify your CSS, JavaScript, and Liquid files, use the Shopify app File Optimizer.
For manual minification, use this guide to minify CSS: Shopify Liquid Lesson: Auto Minifying CSS.
And use this tool to minify JavaScript: JSCompress.
*Make sure to back up your theme before minification, and keep an unminified version in your theme in case developers need to edit them later.
If you have a JavaScript file in your theme assets folder that ends in .liquid, you won’t be able to use common minify tools because there is liquid code mixed in with the JavaScript. In that case, you’ll either want to separate the JavaScript code, minify, then put back between the liquid code, or use the File Optimizer app.
If your code has errors, minifying it might not work. If you have errors, you’ll want to either read your code and fix, or you can use validator tools like ValidateJavaScript and CSS Lint. Have fun! 🤓
Minifying 3rd party resources
If you get a warning in the Analyzer for 3rd party file minification, this means one of your apps is probably serving up unminified files.
In this case, there’s nothing you can do except ask them to minify the files. Sometimes they will, sometimes they won’t. It’s best practice to minify files in production, but they might have a reason not to.
If you want to contact the app developer, here’s a template you can use:
Hi,
It looks like there’s an unminified CSS file being served from your app (see attached screenshot).
Any chance you can minify that?
Thanks, love your app by the way!
4. Technical optimizations
These are a little more nerdy than the other sections in this guide (probably going to require a developer)… so I just grouped them as “technical optimizations”. Enjoy! 🤓
Fix server errors
Some errors are harmless, some can drastically reduce your load speed, most are in the middle. These are usually caused by broken code or old app code loading, so I would fix all of them.
You can quickly check for errors using Chrome Dev Tools:
- Open Chrome web browser
- Open Chrome Dev Tools console (
Command + Option + Jin Mac,Control + Shift + Jin Windows) - Navigate through a few pages on your site and look for errors (they’ll be in red)
You can find examples and more details here: Finding and Fixing Server and JavaScript Errors.
Gzip compression
Shopify handles this for you, so if you see this warning in the Analyzer, it means a 3rd party app is serving up uncompressed files.
This usually isn’t a big deal, but if you’re seeing a warning here of 50kb or higher, it’s worth investigating.
To solve, open the Gzip compression details in the Analyzer and look at the file names. If you recognize a file belonging to a certain app, you can contact them and ask if they can compress that.
Here’s a template:
Good morning,
I ran my site through the Shopify Analyzer and got a gzip compression warning that looks like it’s coming from your app (see attached screenshot).
Any chance you can compress that?
Thanks, great app by the way!
Look for bottlenecks
You can use webpagetest.org or Chrome Dev Tools to analyze your page’s waterfall to see each file loading to build your page.
If you haven’t seen a resource waterfall before this might be like looking into the Matrix, but at minimum you can look for anomalies like files taking a long time to load, blocking other resources, or giving errors.
Waterfall example from webpagetest.org:

If you spot something weird, look at the filename, that will give you the clue on what’s causing it and where to start debugging.
Async non-essential scripts
If you have a script that’s not important for critical page load, you can either move it to the bottom of the page (defer), or load it asynchronously so the key elements of the page can load faster and display to the user.
Converting a script to asynchronous is easy, just add the async attribute to your script, like this:
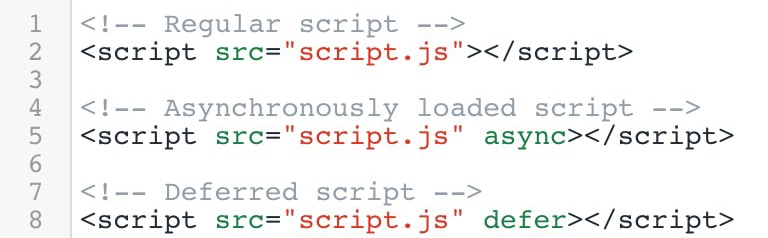
Asynchronously loading is like downloading the script in the background, then executing it when it’s ready.
Deferring a script will defer the execution of the script until the html document has parsed. Deferring is like moving the script to your footer.
You can experiment with those, but my general rule of the thumb is to keep scripts essential for page render as regular (things like jquery.js), and async or defer scripts that aren’t essential for page render.
I’ll experiment with moving scripts or defer them based on the situation if it makes sense (or if there are a lot of scripts).
Use caution and test this before publishing live. If a script has a dependency on the script you async’d, you might get JavaScript errors or break stuff.
Liquid inefficiencies
Liquid = Shopify’s templating language that controls data flow and conditions in your theme.
For most sites you don’t have to worry about this, but if you have a site with a huge product catalogue, excess liquid logic could slow things down a bit.
An example is the for loop. This instructs the code to loop through a collection of data until it finds what it’s looking for.
Here’s a basic example:

This basic example won’t affect performance, but if you have multiple nested for loops searching through huge collections and products, that processing time may contribute to load time.
Server configuration
This is handled for you 100% by Shopify, take a breather 😎
Shopify servers are fast so you’re all set here. If you ever have a random website problem and you haven’t edited your theme or apps, it might be a server issue.
You can check Shopify’s status here: status.shopify.com.
Their servers are usually cruising along nicely, but sometimes they go down or have issues. Ironically, there was a significant one today, lucky me:
I’ve been working with Shopify regularly since 2012, and I can’t remember any huge issues, most of the time if something happens it’s fixed pretty quickly. That status url is good to save though just so you know what’s going on, and that you didn’t break anything 😄
Resource Hints / Preloading
Resources hints are html attributes you can use to instruct the browser to optimize the loading of certain resources.
4 Examples:
<link rel="preload" href="{{ jquery.min.js | asset_url }}" as="script">
<link rel="prefetch" href="{{ stylesheet.css | asset_url }}">
<link rel="dns-prefetch" href="//cdn.shopify.com">
<link rel="preconnect" href="//cdn.shopify.com">
These commands can help fetch critical resources faster + improve overall site navigation.
For details on each method and how to implement them, see our guide Using Resource Hints for Performance Optimization on Shopify Sites.
5. Design optimization
These are features that affect your performance… non-technical optimizations that affect the look of your site.
I’m not here to tell you how to design your site, I’m just the messenger to let you know the performance risks.
Use heroes not sliders above the fold
Hero = a single banner image at the top of your site (home page usually) showing how awesome your product is, or maybe a lifestyle image, or maybe a collage of people using your product.
Sliders = image sliders that cycle through large banner images and require a jquery plugin (usually).
I’m not trying to bag on sliders, but they slow down your site especially if right at the top of your page.
The exception is product page image sliders. These are intuitive and engaging, and aren’t huge banner sliders like you find on the home page of some themes. Keep these.
Arguments against large banner sliders:
- They slow down your site
- People don’t interact with them as much as you want them to
- On mobile, scrolling down is more natural than swiping
What if I told you only 1% of people click on sliders? You can google something like “are website banner sliders good” to check some results, my favorite is Sliders suck and should be banned from your website 😂
Recommendation: Try using a single hero image, with a cool lifestyle image or clear messaging / call to action.
Studies and recommendations don’t work for 100% of people, so if you like the slider and want to keep it, try A/B testing to know what works best for your site / audience.
Carousels
Carousels are cool. But like sliders they add extra page weight and resources.
I like carousels though in certain spots, so I say keep them, just don’t go overboard.
Good: have 1 or 2 carousels on your home page showing trending products, new arrivals, or favorites.
Bad: having a gang of carousels each with 20 products inside them, loading potentially 100+ extra resources.
Best move is to hard code carousels into your theme. My go-to plugin is Owl Carousel.
Mega menus
Mega menus look pretty cool, but it’s another potential bottleneck because of the amount of resources + being above the fold, at the top of every page.
If you’re using an app for this, it’s probably slowing your site down.
Whether you’re using an app or your theme feature, if you’re using a mega menu, these tips will help minimize the performance lag:
- Make sure the images are compressed and loading at a reasonable size (see the Image Optimization section above)
- Use webpagetest.org to test the performance difference with and without the mega menu
- If you’re using an app, consider hardcoding the feature into your theme
Quick View

If the quick view feature is coded well (using ajax to pull in the contents after the user clicks), it might be ok.
If the quick view feature is NOT coded well (every quick view popup is loaded at page load), you’re adding a big lag on load speed.
You can test this by searching for an image that exists in the quick view popup only. Then compare your loaded resources with either the Shopify Analyzer or Chrome Dev Tools. If you find that file in those tools, it means it’s loading on page load (along with all other quick view content on that page).
I prefer not to use quick view features for 2 reasons:
- They slow the page down
- You get more time on page, but fewer page views. I like page views
Mobile first mentality
Most Shopify sites I see get more mobile traffic than desktop now, so “mobile first” design is key for a great user experience.
Even if your customers are still purchasing more on desktop than mobile, you still want to create a great first mobile experience, then when you retarget them they’re more likely to buy either way.
As an internet entrepreneur you probably spend a lot of time on your computer. That’s great for getting work done, just make sure you’re spending time browsing your site on your phone too. Be the customer.

If you find yourself out somewhere with a slow connection, this is the perfect time to browse around your site. If you test your site on slow connection and it’s still pretty fun and easy to use, then your performance is strong and you’re maximizing conversions on any connection.
Thought experiment: When’s the last time you went through your full funnel? On your phone? Like, the whole funnel:
- searching a product
- clicking on your listing (and see what it looks like in google compared to others)
- engaging with your site, “learning about your brand”
- adding / removing products to cart
- abandoning your cart
- getting retargeted (by email, FB, IG, etc)
- coming back to your site and completing purchase
- getting your post-purchase emails
- receiving your product
- unboxing and reading product packaging
I would try to have someone on your team do this at least once a quarter, you might spot some errors, get new ideas, or find ways to improve the experience.
NOTES ABOUT APPS
Some people might say “uninstall apps” as optimization advice.
Ya that will help, but let’s keep in mind the main goal of your Shopify site: to sell products.
Performance is important but if your apps are creating engagement, increasing sales, and growing your audience then keep those apps.
Performance is a balance. There are pure technical optimizations that don’t affect user experience, and those are great, but with anything that affects design or the UX, analyze and test before you chop down all the trees.
We’ve had customers show up with over 60 apps before, whoa! 😮
More power to ya if they’re all working well, but chances are there’s some lag going on there (there was in the cases we’ve found).
A delayed email harvesting popup is good to build your list, but we’ve seen sites with 4 popups slamming the user right when they land on the page. That’s not good for the user or your performance (or SEO, Google doesn’t like insta-popups).
Test your site (clear your cookies first), be your customer, and improve one thing in your funnel today.
If you want to know what apps I think are great, check out our current list of the best Shopify apps.
SUMMARY
Use the Shopify Analyzer to see what optimizations can help make your site faster.
If you’re limited on time or budget, focus on the key areas first:
- Image optimization (guide here)
- Lazy loading (guide here)
- App analysis and optimization (guide here)
Test your funnel from mobile, use A/B testing to see if apps or designs are helping or hurting.
Optimize your site now and enjoy a long term boost in your key metrics.
WHAT ELSE?
Is there anything else you want to know? Anything else I should include in this post? Was this guide useful? How else can we help your Shopify site be more awesome?
Comment below 👇 or contact us to let us know. Our mission is to make your Shopify store more successful, so give us a shout if you have any questions or feedback.
Cheers ☕️